Cart
0
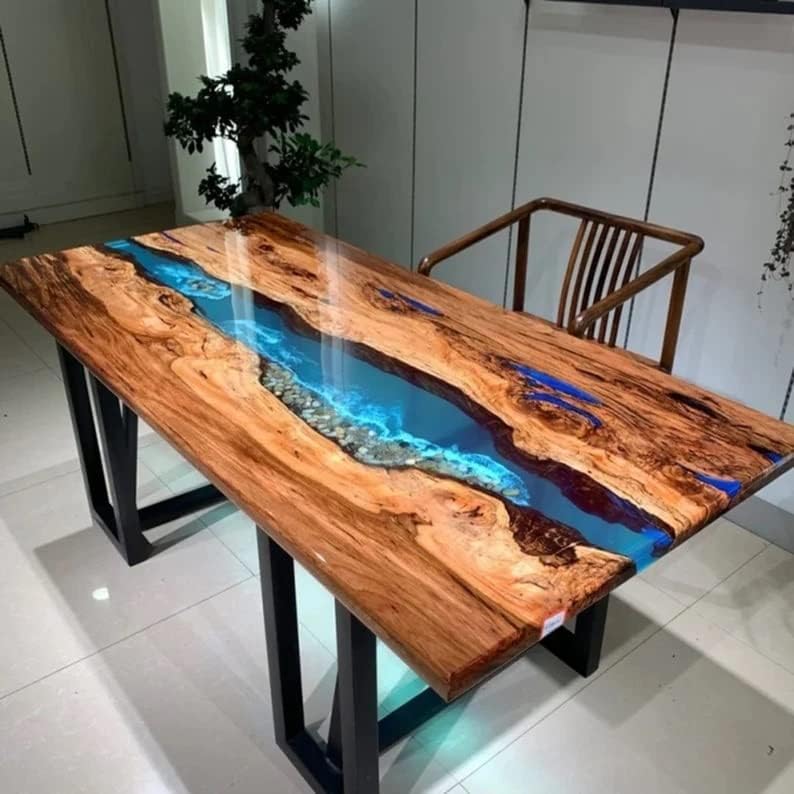
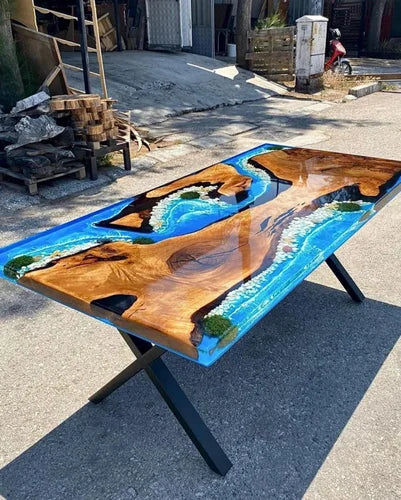
Resin tables, known for their stunning finish and versatility, have grown increasingly popular among interior design enthusiasts and DIYers alike. With endless customization options, they allow for the creation of unique, one-of-a-kind pieces that can become the focal point of any room. Whether you’re a seasoned resin artist or a beginner, perfecting your technique can take time. Here are some essential tips and tricks to help you create a flawless resin table.
1. Choosing the Right Resin
The type of resin you choose will greatly affect the final product. Epoxy resin is the most commonly used type for resin tables due to its durability and clear, glossy finish. However, not all epoxy resins are created equal. Here are a few key factors to consider:
- UV Resistance: Look for a resin with UV resistance to prevent yellowing over time.
- Curing Time: Some resins have fast curing times, which may be ideal for smaller projects but tricky for large tables. Choose a resin with a curing time that suits your project.
- Viscosity: Lower viscosity resins are easier to work with for filling molds or intricate designs, while higher viscosity resins are better for building thicker layers.
2. Surface Preparation
Before you pour the resin, surface preparation is key to ensuring a smooth, long-lasting table. Follow these steps:
- Cleaning the Surface: Whether you are working with wood, metal, or another material, ensure the surface is completely clean and free of dust, grease, or debris. Any foreign materials can affect how the resin adheres to the surface.
- Sealing the Wood: If you’re creating a resin river table or using wood, make sure to seal the wood surface first. Sealing helps to prevent air bubbles from escaping and ruining the clear finish. A simple, clear epoxy layer works well for this.
- Leveling the Work Area: Resin is self-leveling, but your work surface must be completely flat to avoid uneven thickness in the final result. Use a spirit level to check your workspace and make necessary adjustments.
3. Mastering the Pour
Pouring resin requires precision and patience. Here are some tricks to get a clean pour:
- Use Multiple Layers: Pouring resin in layers of 1/8 to 1/4 inch thick helps prevent bubbles and overheating. For larger tables, this is especially important to maintain clarity and reduce curing issues.
- Minimizing Bubbles: To minimize bubbles, use a heat gun or torch to quickly run over the surface of the poured resin. The heat will pop any surface bubbles, but be careful not to burn the resin. For deeper layers, use a pressure pot or vacuum chamber if you have access to one, as this can help eliminate air bubbles trapped deeper in the resin.
- Mixing Resin Properly: Improper mixing of the resin and hardener can result in sticky spots or soft areas. Always follow the manufacturer’s instructions, ensuring you mix for the recommended time (usually around 3-5 minutes) and scrape the sides of your mixing container.
4. Incorporating Natural Elements
One of the beauties of resin tables is that you can encapsulate almost anything within the resin. Wood is a popular choice, but here are a few tips to make the most out of natural inclusions:
- Wood Dryness: If you’re incorporating wood, ensure it is completely dry. Moisture in wood can lead to bubbles or cracks once the resin starts curing. Use a moisture meter to check your wood before use.
- Live Edge Wood: If you’re using a live edge slab for a resin river table, clean and seal the live edge thoroughly to prevent any bark or dirt from contaminating the resin.
- Adding Stones or Crystals: For a semi-precious stone tabletop, you can embed stones or crystals into the resin. Be sure to arrange your materials before pouring the resin, as the process can be time-sensitive. To avoid stones sinking to the bottom, place them after pouring the first resin layer, then add additional layers once the resin becomes tacky.
5. Coloring and Special Effects
Resin tables allow for endless creativity in terms of color and effects. Here are a few ways to enhance your design:
- Pigments and Dyes: You can add pigment powders, mica, alcohol inks, or liquid dyes to color your resin. Start with small amounts of pigment, as a little goes a long way. Blend well to avoid streaks.
- Metallic Effects: For a shimmering effect, mix metallic pigments or powders into the resin. You can also swirl two or more colors together to create a marbled or river effect.
- Glitter and Flakes: Add a touch of glamour to your resin table with glitter, metallic flakes, or foil. However, be mindful of the amount used, as too much can cause the resin to look cloudy.
6. Proper Curing Conditions
Resin curing is temperature and humidity sensitive, so controlling your environment is essential for a perfect finish. Keep these tips in mind:
- Ideal Temperature: The optimal temperature for curing epoxy resin is between 70-85°F (21-29°C). If it's too cold, the resin may not cure properly; if it's too hot, it can cure too fast and create imperfections.
- Humidity Control: High humidity can cause a cloudy finish on your resin due to moisture absorption. If you live in a humid climate, consider using a dehumidifier in your workspace.
- Protecting the Table: While the resin cures, cover your table with a dust cover or plastic tent to prevent dust, insects, or other debris from landing on the surface.
7. Sanding and Polishing
Once the resin has fully cured (usually after 24-48 hours), you may notice some imperfections, such as uneven surfaces or rough edges. Sanding and polishing will help you achieve a smooth, glossy finish.
- Wet Sanding: Start with wet sanding, beginning with a lower-grit sandpaper (around 220) and gradually moving up to 1000 or higher. Always keep the surface wet to avoid clogging the sandpaper and damaging the resin.
- Polishing: After sanding, use a polishing compound and a buffing machine to achieve a high-gloss finish. This will bring out the natural shine and clarity of the resin, giving it a professional appearance.
8. Maintenance and Care
Resin tables are durable, but they require proper care to maintain their beauty over time. Here’s how to keep your table looking as good as new:
- Avoid Direct Sunlight: Even UV-resistant resins can yellow over time when exposed to direct sunlight. Place your resin table away from direct sunlight to extend its life.
- Use Coasters and Mats: Hot objects like mugs or pans can leave marks on resin surfaces, so always use coasters or heat-resistant mats to protect your table.
- Regular Cleaning: Clean your resin table with a soft cloth and mild soap. Avoid abrasive cleaners or scrubbing tools, as they can scratch the resin.
Conclusion
Creating a resin table is both an art and a science. By following these tips and tricks, you’ll be well on your way to mastering the craft and producing stunning, professional-grade tables. Remember, practice makes perfect, so don’t be afraid to experiment with different techniques and materials. Happy crafting!