Cart
0

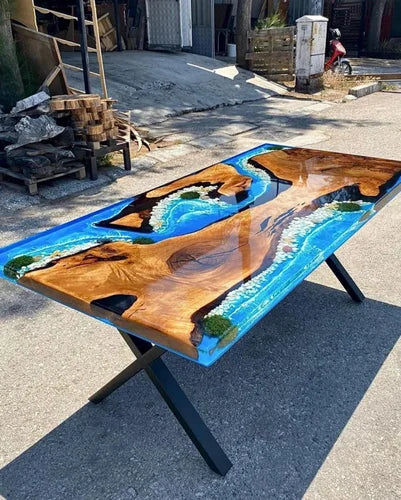
Live edge tables have become a symbol of natural beauty and craftsmanship in modern furniture design. These tables, which preserve the natural shape of the wood, bring a rustic and organic charm to any space. Crafting a large live edge table, particularly one that integrates epoxy resin, is a meticulous and artistic process that involves several stages, from selecting the perfect wood slab to finishing the table with a smooth, glossy surface. In this blog, we will explore the detailed steps involved in creating a large live edge table, revealing the care, skill, and precision behind each piece.
What is a Live Edge Table?
A live edge table preserves the natural, uneven edges of the wood, highlighting the raw beauty of the material. Instead of cutting the wood into straight, uniform lines, the craftsman retains the natural contours and textures of the wood, giving the table a unique, organic look. This natural edge can be paired with epoxy resin to fill cracks, gaps, or even large spaces between two slabs of wood, creating a striking combination of natural and modern aesthetics.
Step-by-Step Process of Making a Large Live Edge Table
1. Selecting the Wood Slab
The first and perhaps most important step in crafting a live edge table is selecting the right wood slab. The choice of wood significantly impacts the table's appearance, durability, and overall feel. Hardwood species like walnut, maple, and oak are popular for their strength and beautiful grain patterns.
When selecting a slab for a large live edge table, the natural contours and imperfections are key features. The live edge showcases the tree’s natural growth, so no two slabs are identical. The craftsman carefully chooses a slab with the desired width, length, and unique edge shape to fit the project’s requirements.
2. Kiln Drying the Wood
Once the wood slab is selected, it needs to be kiln-dried to reduce its moisture content. This is an essential step to ensure the wood is stable and less prone to warping or cracking over time. Kiln drying removes excess moisture while preserving the integrity of the wood, making it suitable for furniture making.
For large live edge tables, especially those using thick slabs, proper drying is critical to avoid future issues like splitting or bowing. This process can take several weeks, depending on the wood’s thickness.
3. Preparing the Slab
After drying, the wood slab is prepared for shaping and sanding. The craftsman inspects the slab, removing any loose bark from the live edge while preserving the natural shape. The slab is then flattened and smoothed, which may involve:
- Planing the Surface: A planer is used to flatten the surface of the slab, ensuring that it lies evenly.
- Filling Cracks and Voids: Any cracks or voids in the wood are filled with epoxy resin. The resin not only strengthens the wood but also enhances the visual appeal by contrasting with the wood grain.
4. Resin Pour (If Applicable)
For tables that incorporate epoxy resin, this step is where the magic happens. If there are gaps or spaces between two live edge slabs, the craftsman pours epoxy resin into these areas. This resin can be clear, giving a glass-like appearance, or tinted with colors to create a dramatic effect.
The resin pour is done in stages, as thick layers of resin require time to cure. Depending on the design, the resin can create river-like patterns, adding depth and visual intrigue to the table. For large tables, the resin filling can take several days to fully set.
5. Sanding and Shaping
Once the epoxy has cured, the entire slab is sanded to ensure a smooth surface. This is a crucial part of the process, as sanding helps to blend the wood and resin together, creating a seamless finish. Multiple rounds of sanding are performed, starting with coarse grit and gradually moving to finer grits to achieve a silky, smooth texture.
During this stage, the craftsman also shapes the live edge, making sure the natural contours are clean but still organic. The sanding process helps to highlight the wood grain and the clarity of the resin, revealing the full beauty of the material.
6. Applying Finish
After sanding, a protective finish is applied to seal the wood and resin, enhancing the natural beauty of the table and protecting it from damage. Common finishes include:
- Oil-based finishes: These penetrate the wood, bringing out its rich colors and natural grain.
- Polyurethane: This creates a durable, water-resistant layer, perfect for dining or outdoor tables.
- Epoxy finish: In some cases, an additional layer of epoxy resin is applied to create a high-gloss, glass-like finish.
The finish is applied in thin layers and allowed to cure between coats, ensuring the table’s surface is both beautiful and long-lasting.
7. Attaching the Base
The final step in crafting a large live edge table is attaching the base. The base is crucial not only for the table’s functionality but also for its overall aesthetic. Metal bases are popular for their modern look and strength, while wooden bases can complement the natural feel of the live edge.
The base is securely attached to the slab, ensuring that the table is stable and can support the weight of the large wood slab. For large tables, the base design needs to provide adequate support while enhancing the table’s visual appeal.
Why Choose a Large Live Edge Table?
Live edge tables are not just pieces of furniture; they are statements of art and nature combined. Here’s why they stand out:
- Unique Design: No two live edge tables are the same. The natural contours of the wood make each piece one-of-a-kind, with its own character and beauty.
- Natural Beauty: By preserving the natural edge of the wood, live edge tables bring the outdoors inside, creating a warm, organic atmosphere in any room.
- Durability: Hardwood slabs, paired with epoxy resin, create a durable table that can withstand heavy use while maintaining its beauty for years.
- Customization: Live Edge tables can be customized in terms of size, wood species, resin color, and base design, allowing customers to create a table that fits their exact needs and style preferences.
Conclusion
Crafting a large live edge table is a meticulous process that combines nature’s beauty with human craftsmanship. From selecting the perfect wood slab to carefully pouring epoxy resin and finishing the table, each step requires precision and attention to detail. The result is a stunning, one-of-a-kind piece of furniture that is not only functional but also a work of art. Whether you’re looking for a statement piece for your dining room or a unique office table, a large live edge table is a timeless investment that brings nature’s elegance into your home.